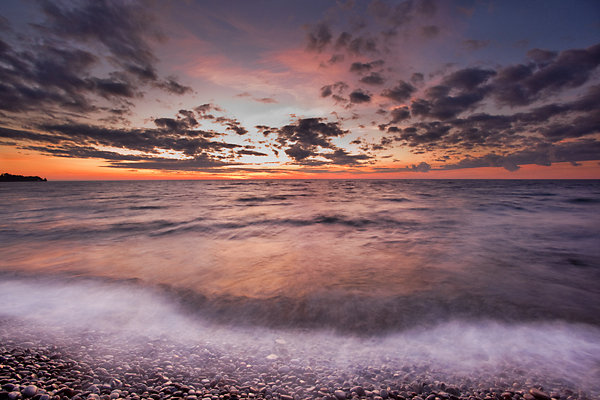
In the Field: This image was made at the State University of New York at Oswego campus where I teach located on the southeast shore of Lake Ontario. I was almost ready to leave for the night when suddenly the clouds in the background began to light up with pink sunset light. Using a 17-40 mm wide angle lens set at 17 mm on my Canon 5D Mark II camera, I added a two-stop, soft-edged split neutral density filter when making the exposure. I placed the dark part of the filter over the brighter sky to hold detail, and the clear portion of the filter over the darker water. This was an ideal situation for using this filter since I had a clean horizon line with no objects breaking the horizon. In general, I prefer to make a single exposure whenever possible using this filter rather than making two separate exposures (one for the sky and one for the water) and combining them later in Photoshop. I waited until the wave began to recede before starting the 1.6 second exposure. This resulted in a mist-like appearance of the wave over the rocks in the foreground.
In the Computer: After importing the raw file into Lightroom 2, I made the following adjustments: I warmed the image up slightly, from its initial value of 5150K, to 6000K using the Temp slider. Next, I increased the Exposure by +0.25 to brighten the image slightly, and I moved the Recovery slider to +80 to recover detail in some of the bright highlights in the sky, which were slightly overexposed. I added +30 to the Vibrance and +20 of Saturation to the Red and Orange channels. Finally, I used the Graduated Filter to darken the sky by about a third of a a stop and the Adjustment Brush to lighten the white waves by half a stop. I find that I can do about 75-80 percent of my image optimization using Lightroom. To finish off the image I imported the image as a TIFF file into Photoshop CS4. There, using a Hue/Saturation Adjustment Layer, I added +12 to the Reds, Yellows, and Blues channels. It is important not to add too much color saturation or the colors begin to look unnatural. Finally, I resorted to one of my favorite techniques, which allows me to dodge and burn on the same layer. I clicked on Layer > New > Layer... (or Shift+Ctrl+N), chose Mode > Overlay in the New Layer window, and checked the box labeled Fill with Overlay-neutral color (50% gray). With the Set foreground color icon in the floating palette set to black, and using a soft-edged brush with the Opacity set to 10%, I painted over the central portion of the water and the brightest part of the sky to darken them slightly. Then, choosing white as the foreground color, I painted over the white waves to lighten them slightly. After flattening and resizing the image for posting on the web, I added a Shadow/Highlights... adjustment giving 25% to the Amount and Tonal Width, and 25 pixels to the radius, all within the Shadows window.